
Your Quest
You must successfully kill two elk (of any type) to complete the Learn to Hunt quest.
What to Eat?
In Yellowstone, elk are wolves' main meal. You can also hunt and eat other prey: mule deer, moose, snowshoe hares, beavers, pronghorn, bison, and bighorn sheep (coming soon!). Note: adult bison are tough to kill but you might find a carcass.
Predators try to expend the least effort for the most calories, while also considering the level of risk. A snowshoe hare might be the easiest to kill, but hunting enough hares to feed a whole wolf pack is not worth the effort – compared to an elk feast that could sustain a pack for a week or so. Scavenging at a carcass is a great way to get calories but not if you have to fight a grizzly or rival wolves to get a few bites.
Success means surviving the hunt. So you will want to choose prey that won't kill you. You may want to save your game before undertaking a hunt. Ungulates (hooved mammals) have formidable defenses! If you are playing on Accurate, expect to be successful hunting only a small percentage of the time (so strategize like a real wolf).
The strength, speed, and danger of prey varies so choose wisely. An adult moose or bull elk is a pretty tough target. Mule deer are less dangerous but are very fast. Hares are no danger to you, but hardly more than a snack. Elk seek safety in numbers. Younger animals are less dangerous but may have mothers protecting them. Note: You can't eat competitors like stranger wolves and coyotes.
Learn more about PREY on the WolfQuest website
How to Hunt
WHERE the PREY ROAM
The first step in any hunt is to locate your prey of choice. Prey can be found most anywhere, as they roam freely (rather than spawning in fixed locations as in past versions of WolfQuest) so it usually takes some concentrated effort to find them. In autumn, elk herds tend to graze on the ridges and in the forests. Mule deer and moose don't travel in herds but are found scattered throughout the habitats. Hares are fairly common, if you need a light lunch. Once bighorn sheep are added to the game, they will stick close to the cliffs.
Prey ignore wolf pack territories but you should not! Hunting on rival turf could prove hazardous to your health. One hunting strategy is to chase your prey out of enemy territory so you can enjoy you meal more safely. Press M or TAB to view your map, your location, and pack territories.
LOCATING PREY: SCENT VIEW
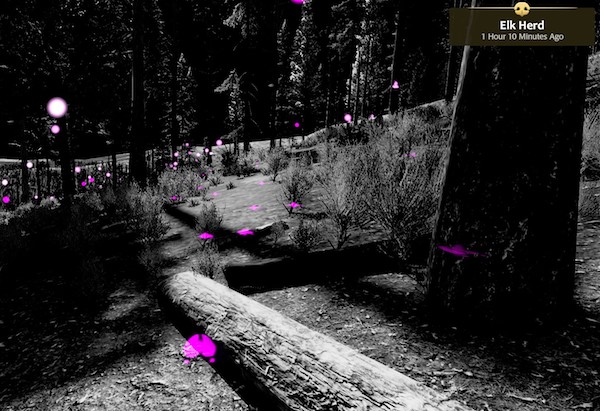
After choosing your general hunting area, track other animals using Scent View: Tap V to switch Scent View on or off. Look for scents floating in the air or on the ground. Follow scents to find prey animals or dangerous competitors. Wolves have an excellent sense of smell, so don't get discouraged if you have to follow a scent over a large distance.
Follow airborne scent particles back to their source. Remember, airborne scents float with the wind, so track them upwind (so they float towards you... think of it like wading upstream, into the current.)
Ground scents (glowing footprints) appear when you get close to other animals. Follow them to their owner.
Watch the scent info in the upper right for information about the animal(s) and how recently they passed that way.
SCENT HINTS:
Approaching prey from downwind helps hide your approach.
Different animals have different colored scents.
Male scents might be darker in color than females and young.
Prey animals' airborne scents are round; competitors' are diamonds.
Carcasses' floating scents are an X icon, the color of the animal (R.I.P).
Ground scents are shaped like the real animal's footprints so you can see the direction the animal was going, once you learn their print shapes.
The age of a scent (displayed in the top-right panel) will also help guide you to the animal.
CHASING PREY
After following your nose to your prey, it's time to begin the chase. Some animals, like mule deer, will likely bolt the moment they catch wind of you so you'll have to be quick. Other prey, like dangerous moose, might stand their ground, unimpressed or even aggressive. Hares have no defenses other than hiding or running.
Note about stealth: Yellowstone wolves don't use stealth when hunting because prey seem to know where the predators are in such open landscapes. The game prey are alerted by proximity. You can crouch but it doesn't actually hide you in the game (it just adds a little ambience). You might, however, gain a small advantage if you approach prey from downwind. This might help you catch an easily startled prey animal.
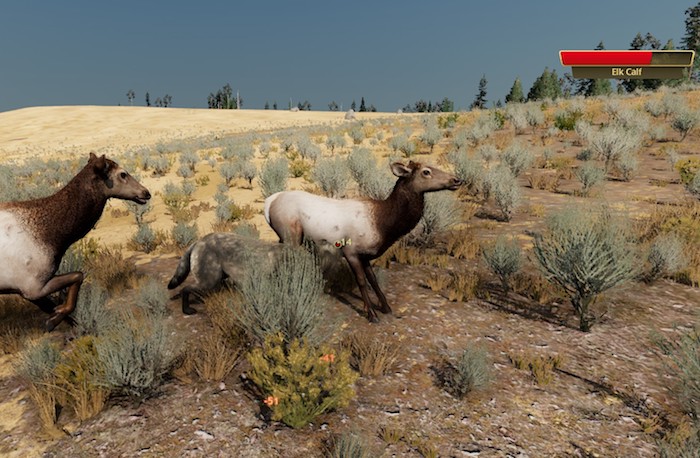
When a predator approaches, elk go on alert while milling around in the herd, watching to see if there is actually a threat. No point in wasting energy fleeing if the predator isn't hungry! If you move into the herd, the elk might scatter or they might react aggressively (especially the bulls). Ungulates can kick with their front legs and back legs. Mothers will protect their calves. Males with antlers or horns may attack with them.
You want to get the elk moving, so pick some targets, test their health, give chase to the weakest one you can find, and bite them until they run out of health. As a lone wolf, it might take some work to spook an elk herd into running. You just aren't that scary. But you want them to run so they can't use their powerful front kicks against you. Ways to increase the chance of the herd bolting include running at them or growling, using the G key or the Emotes panel (opened with E).
Prey will grow tired as you chase them, with weaker animals slowing down more than stronger animals, so use this tactic to identify which ones to target.
New in V1.0.8n: Occasionally an elk will stumble and fall to the ground while fleeing from wolves. Keep an eye (or ear) out for this occurrence, as the elk takes damage (but suffers no visible injuries) and often lays on the ground for several seconds before standing and fleeing again. (Damage amount varies widely, from a little to a lot. Elk are more likely to stumble when running uphill or when low on health or energy.)
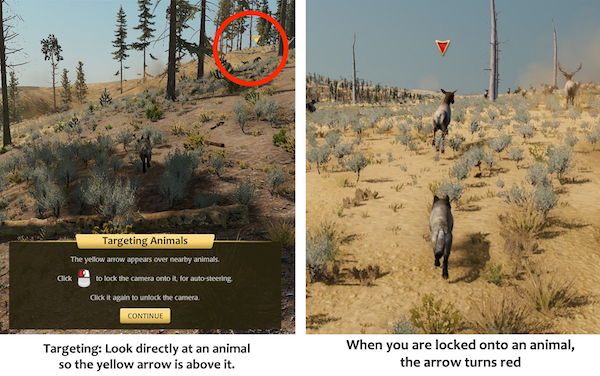
TARGETING
To target a specific animal, look directly at an animal (so the yellow arrow is above it) and LEFT-CLICK to lock/unlock your camera onto it. When an animal is targeted, the arrow will turn red. When are locked on, the camera will stay focused on your target and you will be assisted in steering, as you run.
TESTING
Once the elk are running, your next task is to pick a weaker member of the herd. While hunting random elk can work, your best chance is testing the health of several different elk, and then picking the weakest to take down.
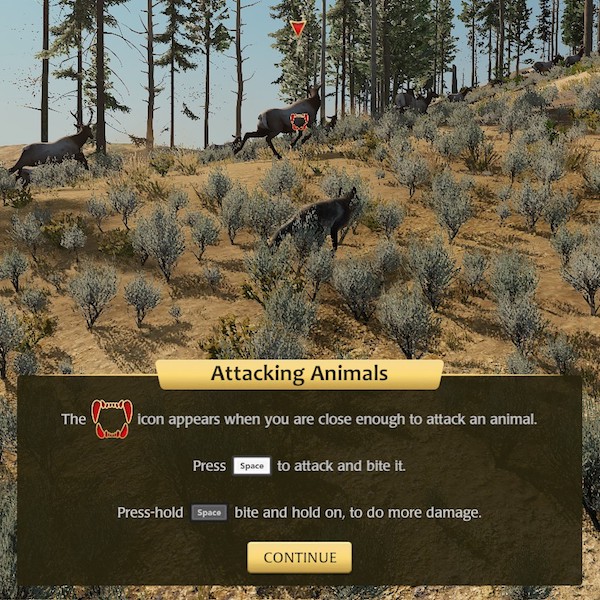
To test the health of an elk: bite it. Get close to your target and, once the red jaws icon appears, you are in range to bite it. Press and hold the SPACEBAR for several seconds to deal damage. To release your bite, stop pressing the SPACEBAR.
Biting reveals the health of that ungulate: a red dot that will appear on their body. A bright red dot means full health (a strong elk!). Health dots fade to black as health drops. Bite several elk in the herd and then pick the elk with the lowest health (a darker dot).

BITING to DAMAGE
To do more damage, bite hard by holding SPACEBAR as long as you can, as sustained bite-holds do more damage to your prey. The amount of damage varies depending on where you bite the elk and how long you bite them. You can bite ungulates on the legs, sides, or neck. Once you have a mate, you can bite on different places at the same time to hunt more efficiently together.
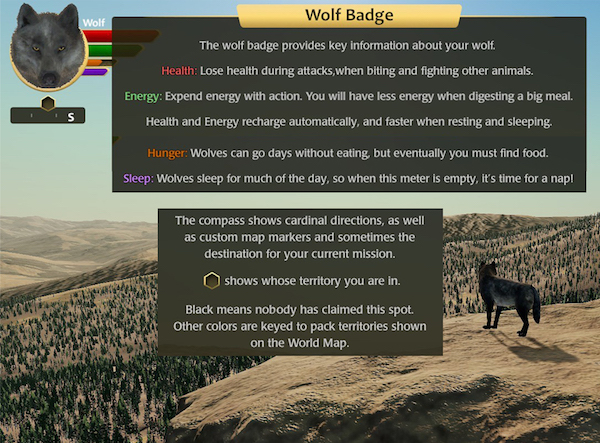
Hunting efforts cost your own energy and health as you expend energy and ungulate prey deals defensive damage. So be sure to keep an eye on the green and red bars on your wolf badge. Health and energy recharge automatically, and faster when resting or sleeping. But try to avoid those hooves!
And remember: elk deal less damage after you've chased them awhile to tire them out.
Eventually, your prey will break your hold, and you'll have to catch back up to it and bite again. Repeat this until your prey either dies or stops running. If it stops running, you've entered a showdown with it.
HINT: The damage you do and the damage you take is randomized at the beginning of the bite and doesn't change (except for effects from changing health). This means you might want to release a bite early if the numbers look bad and try again. But keep in mind, every new bite costs extra energy.
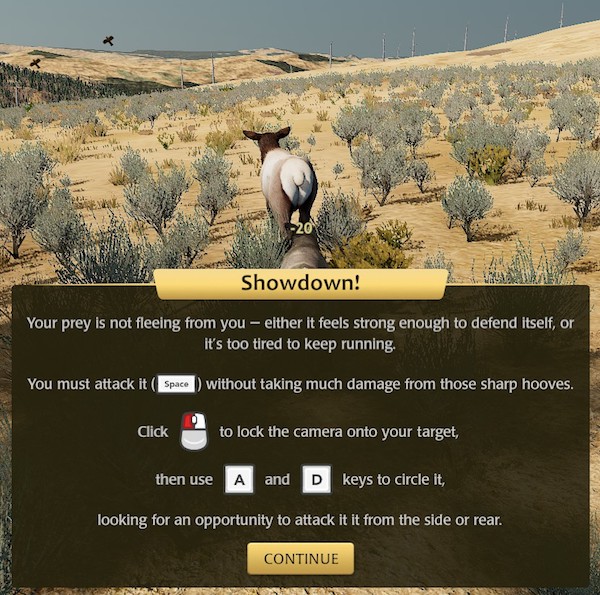
SHOWDOWN
Showdowns with prey can be the most dangerous part of the hunt. At this point, the prey isn't running any longer, and instead has chosen to fight – possibly to the death. The prey will try to face you and attack you with its front hooves. Try to avoid getting hit while still going for extended bite-holds. LEFT-CLICK to lock onto it, then use the A and D keys to circle the prey, looking for a good opportunity to bite (using SPACEBAR). This is the time to try for a neck hold.
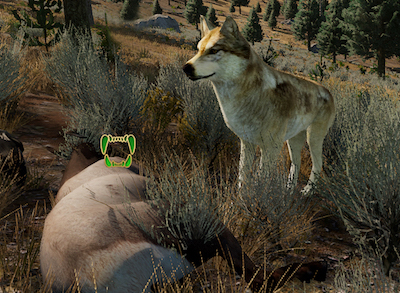
EAT
Once you've finished the hunt, green jaws icon will appear and you can use SPACEBAR to eat your hard-won meal.
Eat as much as you can because the carcass will soon attract other hungry scavengers. Some competitors will fight you to get control of the carcass! Others, like ravens and eagles, will just eat a lot of it, meaning you may have to hunt again sooner.
MEAT CHUNKS: You can pick up meat chunks and small carcasses (hares, beavers, and baby ungulates) and carry them around. You might even find a fish that an eagle dropped.
Tap-hold SPACEBAR to pick up, tap to put down.
Note: Yellowstone wolves don't cache food because there are so many scavengers with good noses that find it right away.
GORE LEVEL: The first time you encounter a carcass, you will be able to choose "low gore" or "more gore" to set the realism of your carcasses. You can also change this later in your game settings.
NAP TIME! Once you are full, sleeping is a good way to digest and restore yourself. Your energy will drop slightly after a large meal. You might not want to sleep next to a carcass as it attracts dangerous competitors.
VIDEOS about HUNTING TIPS & GAMEPLAY
Hunting Tips and Tactics (JayPlays)
We asked JayPlays, a popular YouTuber and longtime WolfQuest player and beta tester, to suggest some tips and tactics to help players hunt elk more successfully. She demonstrates how to find a herd, identify a vulnerable member, deal damage with risky bite-holds, and when hunting calves, avoid the dangerous hooves of the mother.
Hunting for the Hardcore
WolfQuest: Anniversary Edition offers three difficulty levels, which we hope makes the game fun and engaging for a wide range of players. Watch this video to hear how we craft the hardest difficulty level: Accurate.